Total Pageviews

Showing posts with label pinterest. Show all posts

Tuesday, February 12, 2013

Pinstrosiversary- Makeup brushes

With a three year old running around my house all day and an eleven month chasing after her, my house NEVER stays clean.  I am really good at cleaning, but not so much at keeping it clean.  My mom understands what it's like, so she comes over twice a year to do an overhaul on my house.  I am so thankful that she does that.  She and my sister both came over yesterday to help me with some deep cleaning.  My mom scrubbed my shower, washed my blinds, did my floors, etc.  I scrubbed the grout in my bathrooms, washed the baseboards, among many other chores that required elbow grease.  My sister organized my daughters' rooms and closets.  It was so nice after a long day of hard work to just sit back and relax and enjoy how tidy my house was.  I knew it wouldn't last long, so I relished in the moment.


I was determined to get a few areas in my house organized; the areas that tend to get messy the fastest.  One spot in my house that I wanted to organize was my vanity area.  I can never keep it straightened (this one I can't blame on my three year old.)  So I bought a small corner shelf for my lotions, and I picked up some small apothecary jars for hair bands and other stuff.  I also wanted to organize my makeup and makeup brushes.  It's the small stuff like makeup brushes that can turn my vanity into complete chaos.  

I saw this picture of a way to keep your makeup brushes upright and readily available.


http://pinterest.com/pin/201465783302359583/
makeup brush holder missjanet

I thought this would be great for me, especially since I have at least triple the amount of brushes and am always losing them!  I decided to use potpourri instead of marbles, though.... might as well give the filler dual purpose.


After doing this, I realized that I had so many makeup brushes that I really didn't need a filler to keep them upright after all!  Ha!  Oh well, at least this small organizational task made me hunt them all down and put them in one spot.  I'll be more inclined to keep them organized since I put time and effort into it.... I hope so anyway!


Tuesday, February 5, 2013

Pinstrosiversary- Crochet Hats

I was in a crochet mood the last few weeks.  I made about ten hats and am now making a few for people that have ordered them.  I've made a Batman mask, newborn caps, a fireman hat, etc etc.  I searched Pinterest to get pin-spiration.  Some patterns I followed to a T and some I did my own thing and just used the picture as a suggestion :).  Most came out decent.  I'm not a pro at crocheting by any means, but I can get by.  Here's a few that I made.

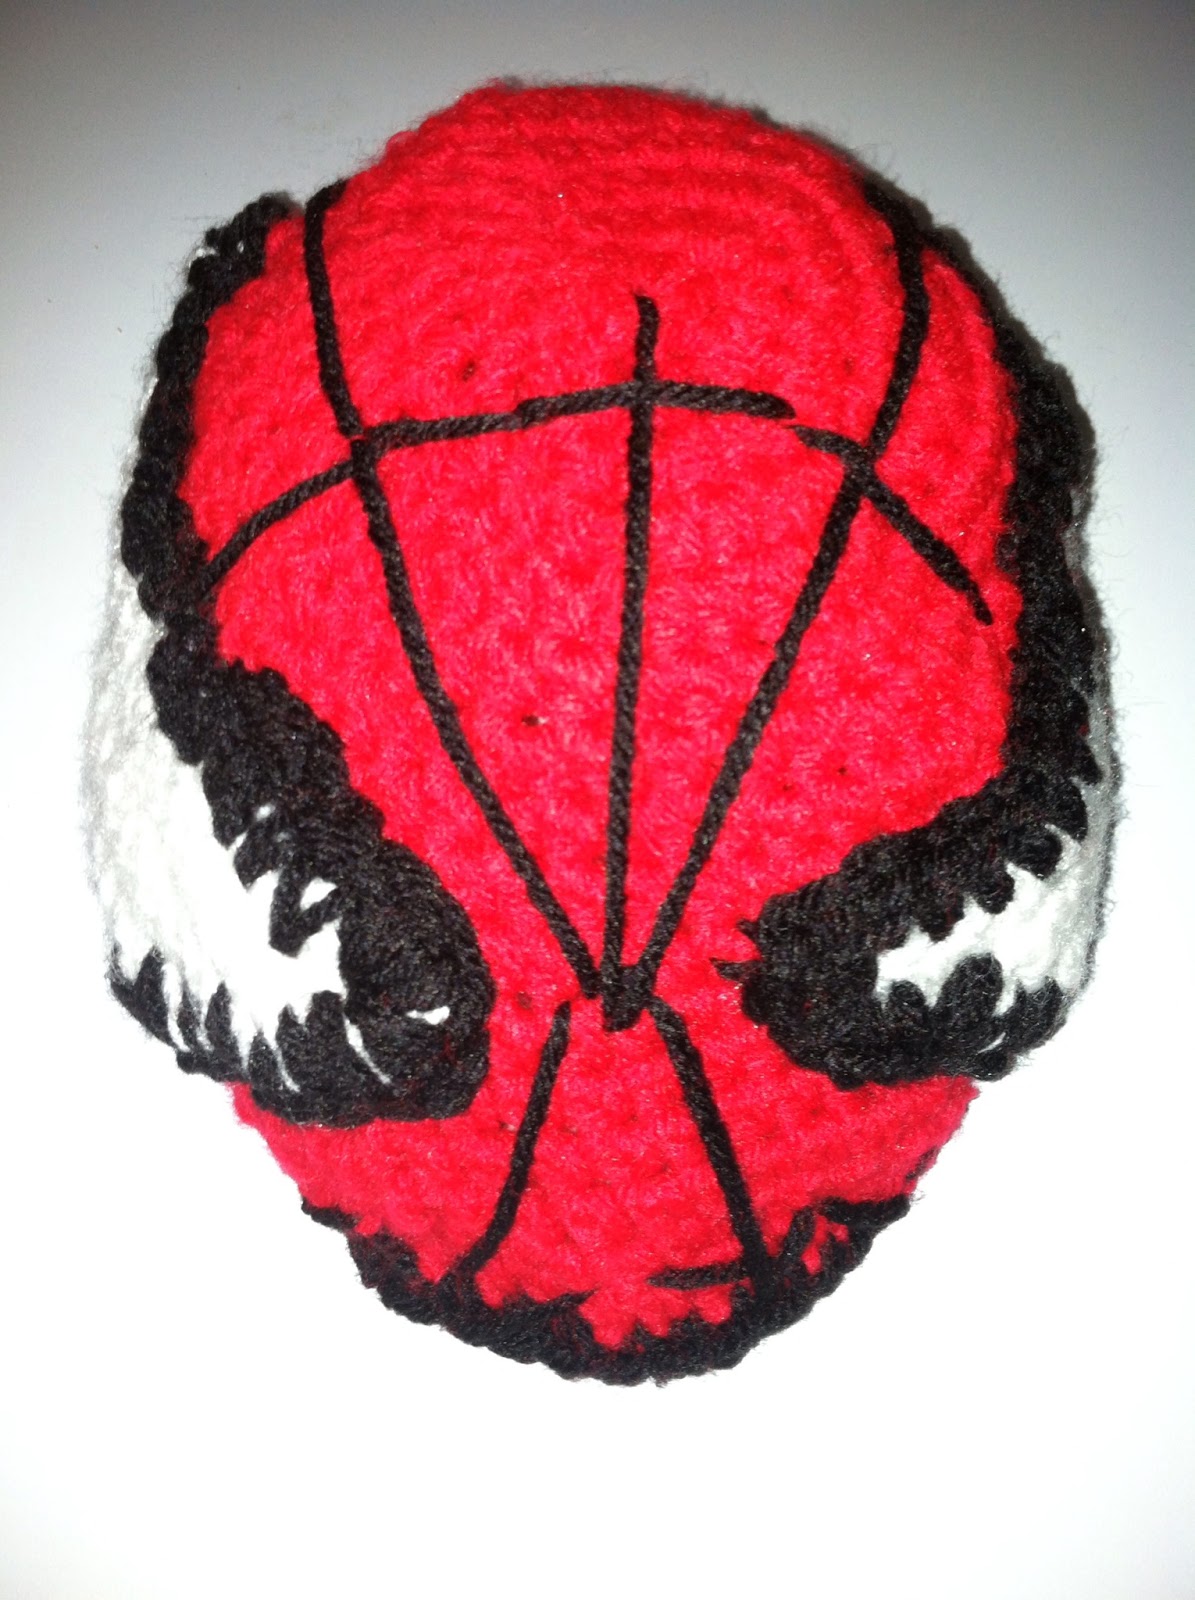
I found this cute free tutorial for a Spiderman Hat on Pinterest
http://pinterest.com/pin/201465783302655216/

This was mine.  It was hard to get the eyes sewn on the hat in a manner that made them look like eyes.  I had to redo it a few times.  It was also a little difficult to get the webbing just right.  But the beanie itself is a good pattern to have for a small child.  There was definitely a learning curve to get this right.  Maybe my next one will come out better.
I also saw this on Pinterest.
http://pinterest.com/pin/201465783302534257/
crochet Rapunzel hat

It inspired me to make a Rapunzel/Tangled wig.  This is what I came up with.  Not the best, but I learned a lot when dealing with LONG pieces of yarn, and my daughter likes it.

For the fireman hat this picture inspired me.  Such a cute newborn picture!
http://pinterest.com/pin/201465783302627251/
Newborn Crochet Firefighter Helmet
I wanted the shape of the hat to look more like a fire helmet so I used this pattern.  I just modified it to fit an infant rather than an adult.
http://pinterest.com/pin/201465783302665639/

FIREMAN-STYLE BRIM HAT

This is mine.  I think it came out cute!


Monday, February 4, 2013

Pinstrosiversary - DIY Portable Barbie Doll House


Like most girls, my daughters love Barbies.  My oldest daughter, Halle, scolded me the other night when I was joining them in their playtime; she informed me that organizing their Barbie box was not "playing Barbies."  Well I just say that depends on who you ask!  I thought it was fun.  So as you might figure I don't like Barbie clutter.

I almost had a heart attack when Halle (the one that scolded me) asked for a Barbie house for Christmas.  I had made it over ten years without having to buy one of those overpriced, bulky, ugly houses.  N ow with three kiddos and toy overflow I certainly did not want to add that to my house now!  I pretty much laughed at her for suggesting it and shot her down.... shot her down bad.  Then I felt bad after Christmas came and went when the poor thing made her own house out of cereal boxes and cardboard boxes (from Christmas presents.)

So this past weekend I decided to do something that I had pinned on Pinterest.  I saw that a lady had made a Barbie house out of three ring binders.  It is collapsible and portable and stores well on a bookshelf.
http://pinterest.com/pin/201465783301380437/

Tutorial on how to create doll houses using three ring binders.- Awesome!

http://southerndisposition.blogspot.com/2011/12/diy-three-ring-binder-barbie-dollhouse.html

She has an excellent tutorial.  This lady used a lot of stuff from around her house as the supplies and printed online images for her wall decor.  I also printed online pictures.  I have no idea which sites I got the pictures from so if they are yours please let me know so that I can appropriately source!

We headed to the store to get the binders.  When we were there we compared the height of Barbie to the height of the binders and realized that Barbie was taller.  We didn't want her to be taller than her house so we bought some small tri-fold project boards instead of the binders.

This was a great craft for she and I to do together and my three and 1/2 year old "helped" too.  The hardest part was thinking of ways to make the Barbie furniture out of things we already had lying around the house and the raw materials I bought from the store.  I used some of the ideas that the original lady did, but I came up a lot of other ideas to make mine unique.

This took me a day and a half to complete.  While the rest of America was watching the Superbowl, I was sewing Barbie curtains, ha!  All of fabric came from scraps that I had or old clothes.  

Barbie Bedroom.
Barbie Bedroom


base made out of cardboard box
reversible comforter
The bed is constructed out of styrofoam and hot-glued together.  The styrofoam that you buy in the craft section is really expensive so I bought a $3 styrofoam cooler instead to use.  The scalloping on the headboard and footboard is from the cooler lid because it came that way.  I bought my son some training toothpaste while I was out shopping, so the cardboard box that it came in became the base of the bed!  I also made a reversible comforter for the Barbie bed made out of a old Hello Kitty shirt and a tank top.  

Barbie Kitchen.
Barbie Kitchen
 My kids already had a fridge and kitchen island, so that helped fill the kitchen.  The island was originally a brownish color so I painted it green to match.  I also painted a green stripe on the fridge.  I used a $0.97 wooden board as the table top.  Halle painted it and glued scrapbook paper to it to make it look like place mats and plates.  The base of the table is a painted upside play-doh cup hot-glued to the wood.  The chairs are made out of Popsicle sticks and marker caps (we have tons of marker caps because my girls always forget to put the caps back on markers and they dry out.)  The fatter the marker cap the better Barbie sits without falling over.  The vase is also a marker cap hot glued to the table.

Barbie Bathroom.
Barbie Bathroom
I only bought three tri-fold boards so this is actually the back "wall" of the kitchen.  The original site used a small oval bowl and clip-on earrings to make the tub, but I couldn't find a small oval bowl at the store.  I did find this cute french bathtub at Michaels, though!  It was 40% off so it was about $10.  This was my most expensive purchase by far.  I painted the rim with gold so it would match.  Instead of a finger bowl for the sink like the original site, I used a small coffee cup.  It is glued to a dollar store candle holder.  I painted them both pink and added a gold rim.  The inside of the cup I left white.  The handle of the cup is turned toward the back so it's not visible.  I glued tulle to the corner to look like a shower curtain and a small wooden rod for the towel holder.  The bath towels are made out of terry cloth from an old baby doll outfit.  Since the bath towel on the wall doesn't move I made an extra for the girls to play with.  I originally decided that Barbie doesn't need a toilet because it's an eyesore and my kids really don't need to pretend Barbie going potty, lol.  My daughters insisted that the room wasn't complete without one, though, so I found a cute pink toilet pic online (well, cute as a toilet can be anyway.)

Barbie Living Room.
Barbie Living Room


ottoman/coffee table made out of  ceramic cup and craft paper 

"bean bag" made out of dry rice
I saved this room for last because I had no clue how to make a durable couch out of styrofoam or cardboard.  Finally it hit me, and I realized I was a genius!  I cut a corner out of the cooler, so the couch is actually one solid piece!
the bottom right corner of this styrofoam cooler is what I made the couch out of.
the original cut of the couch.  I trimmed the edges down to make the arm rests lower than the back.
I then "upholstered" it with an old corduroy toddler skirt.  I didn't have any rhyme or reason when upholstering it.  I just cut and glued until it was covered.  I really didn't care how bad my job was.  You could definitely put more care and actually use a ruler if you wanted.
The pillows I stuffed with toilet paper (I did that with the bedroom pillows too) because I didn't have any pillow stuffing.  The bean bag is fabric stuffed with rice.  The lamp is a painted Barbie stand and a Mason jar lid covered in paper and ribbon.  The ottoman is a dollar store ceramic jewelry holder turned upside down and covered in scrapbook paper.  I pulled some leaves off of one of my artificial house plants and glued them to a marker cap.  The rug is just a piece of thick scrapbook paper and the throw is scrap fabric.  


Total project cost - about $40.  Not bad compared to the $100+ ugly big Barbie dollhouses.  And it's custom.  And we had fun making it.  The best part is that the rooms are collapsible and portable!  They easily slide under the bed and out of the way!  The furniture can be stored along with the other Barbie accessories.
all three boards collapsed. 
I still have two free spaces on the boards for another two rooms.  I plan on adding a patio/backyard and a gameroom.  Someday.

Pinstrosiversary - Icecream Cone Cupcakes Pinstrosity

It was my husband's birthday so I was excited to try out this pin.
http://pinterest.com/pin/71846556526042457/

Pinned Image
I loathe making cupcakes.  I hate pouring the batter into each little liner, the liners folding over and making a mess, and having the batter drip on the cupcake pan between each pour.  Ughhh.  I'd much rather pour the batter into a big fat pan and be done with it.  I also hate peeling the liner off when eating the cupcake.  It's messier to me than just using a fork. 

But...... the idea of baking and eating the cake right out of an icecream cone really appealed to me.  What a great idea!!!!!


Except these are how mine turned out! 


Hahahaha!  I overpoured the batter, and the batter melted the sides of the cones.  You can also see that one of the cones turned over.  I should have put them in a cupcake pan so they would stay upright.  Since the cones are so tall (I used the jumbo cones) some of the cone-cakes weren't completely done.  Oh well, it was 6 pm on my husband's birthday so I just "made-do."

I cleaned them up the best I could and decorated them.
If I turned them just right you didn't notice the bad parts as much.  :)

Now for the taste test.  The cake-part was outstanding (after I baked them longer than I initially did.)  They were very easy to eat and my kids loved them.  The cone had a spongy texture though, rather than crunchy.  I did not care for it.  At least there was no cleanup, though.  No paper plate to throw away or cupcake liner to throw away.  The only clean up I did was my son's face!
 

Pinstrosiversary

Ok, so I am trying to win the contest for Pinstrosity's Blog, "Pinstrosiversary".  I have to submit projects from Pinterest that I have done between January 19 and February 19.  Seeing that I do something from Pinterest just about everyday, I have tons to blog about.  The more I blog about the better chance I have of winning.  Plus it promotes my blog!  So, if you are into DIY and Pinterest, then these posts may be interesting to you (especially the Pinstrosities!)  If you don't give a lick about this stuff, then just disregard all of the posts titled Pinstrosiversary. 

Thursday, January 10, 2013

New Years Party


Brian and I had a small New Year's Eve party.  Actually we had two parties: one for the adults and one for the kids.  The Greens and The Collins joined us, and between us three couples our kids almost outnumber us 2:1.  That's right.  Six adults and 11 kids.  Halle was the hostess of the kid party and kept them entertained while we adults played our own games.  The kid activities were suppose to be done outdoors, but with the pouring rain they mostly stayed inside.  Arden and Myleigh didn't care it was raining, though.  They got soaked from swinging.  The kids weren't allowed at our party and we didn't interfere with theirs.  It worked beautifully.... except for them blowing the horns constantly!  
Poor Dalton looks like the culprit here, when in reality Arden was the biggest noise maker of them all!

KID party:
I blew up some balloons and tied them to a string.  Each balloon had a specific time on it.  The kids popped each balloon at the corresponding time because there was a piece of paper on the inside with an activity.  So every thirty minutes they had something new to do.  They played hide and seek, did a New Years themed scavenger hunt, made foil animals, wrapped each other in toilet paper, etc etc.  I made sure all of the games were easy and fun for the big and little kids.  
Jakob and Jackson playing a game on the make-shift ping pong table. 
not sure who Jackson is wrapping.  Halle maybe?

Nope, have no clue who this is either.  
Halle made a bow out of her foil
On to the adult party!  We had a great time.  Well I did at least!  We played cards, played a few games, and ate and ate and ate.  In addition to the chili cheese dogs, Chuy's dip, and drinks, we had a deep-frying party!  Being the end of the year and knowing that we were about to all commit to fitness goals, why not go out with a binge....  I mean, bang?


Look at that talent! Beating Brian and Nik at this pong game and being a dad at the same time ;)

We fried so much junk.  We fried Twix, Snickers, and Oreos.  We even made biscuilt-donuts and topped them with chocolate and glaze.  Mmmmmm!  I made a funnel cake batter that we used as the breading for our fried treats.  Then we made funnel cakes with the leftover batter.  Nik and Brian got good as swirling the batter in the oil for the funnel cakes; they may just need their own booth at the Rodeo this year.  Oh. My. Goodness.  It was all so delicious!  I was a little disappointed with the fried Snickers, but the Oreos more than made up for it.    

Brian posing with the Oreos while poking holes into the "donuts"


enlarged to show detail
 Doesn't that look so greasy and bad for you????  Yes it was, but it tasted so good.  Alright I'll stop talking about it now because my mouth is starting to water.  Where's my celery sticks and hummus?  

While we ate like pigs we played the mustache game.  "Cheers!" when the mustache lined up with a person on TV. 
Jenny McCarthy mustache you a question.


My husband's a dork.  This was a lot funnier in the moment.  Not sure who Brian was impersonating here, but he had a British accent and was shaking his finger at everyone.
Right before midnight we prepared for our champagne toast.  These are the kids' glasses of "champagne"  It's sprite poured over cotton candy.  This would have been a lovely looking drink if the cotton candy was the right color.  We couldn't find PINK cotton candy at the store, so we ended up with something that looks like it came out of a sewer plant.

New Years Eve: Fill glass with pink cotton candy and slowly pour champagne over it. Such a beautiful beverage. Make it kid friendly by adding sprite in place of champagne.
what it was suppose to look like, lol.  
Oh well the kids didn't know the difference
We all missed the New Year by a minute or two, so we did our own belated countdown.  Apparently the boys were very excited about this.


The kids then had fun with lots of sparklers.  


By adjusting the shutter speed and after many outtakes I was able to capture this on my camera !

HAPPY NEW YEAR!!!